Google has made the announcement that Universal Analytics is being sunsetted on July 1, 2023. This means after this date, Universal Analytics will no longer process data. This means now is your chance to become acquainted with its replacement Google Analytics 4 (Also known as GA4).
As reluctant as I was to make the change to GA4 – I don’t like change- now that I have really started using it I couldn’t be more impressed. Google Analytics 4 is a powerful tool that can really help you make better marketing decisions, and is far more flexible than its predecessor. So here is what you need to know to get started with GA4.
In this Guide, I will cover:
- What’s changed
- How to make the switch
- How to Install GA4 to your website
- How GA4 can help you with reporting
- How to create custom Events and Conversions
- Where to find event data in GA4
- GA4 reports
- How to create Custom Reports
Because this guide covers nearly everything you need to know about GA4 feel free to bookmark the area and come back later. Even though Google wants everyone to move to Google Analytics 4 now, it is still relatively early days so as more is released for GA4 I will be sure to update this guide.

What’s Changed? The main difference between Universal Analytics and Google Analytics 4
The biggest difference between Universal Analytics and GA4 is the measurement model they use. Universal Analytics uses a model based on sessions and pageviews, whereas Google Analytics 4 uses a measurement model based on events and parameters.
In simple terms all Universal Analytics hit types translate to events in GA4. This can get a little confusing as in UA an event has a category, action, label and one hit type. Whereas in GA4 there is no action, category or label, only parameters.
Moving the focus from sessions to events provides us with a real and major benefit. Especially when it comes to your marketing efforts. As it allows you to focus solely on the actions that are making the most impact on your marketing. It also allows for cross-platform analysis and an enhanced capacity for pathing analysis.
By moving to an event-based model, GA4 is more flexible and better able to predict and target user behaviour.
How to make the switch to GA4?
Since Google has announced the “death” of Universal Analytics the question of “Should you switch to GA4” has turned to “How to switch to GA4”.
Since we still have time, I suggest you set up GA4 to run in parallel with Universal Analytics, this allows you to get accustomed to GA4 without having to cut ties with UA completely. Even if you don’t plan on using GA4 just yet, allowing it to start collecting data with make future analysis easier.
How to Set Up GA4?
Setting up GA4 is just a few simple clicks. Google will create a new property for your GA4 to reside in so you don’t need to worry about it disrupting your current UA setup. Your UA view will continue to be accessible via the admin screen.
- Log in to your Google Analytics Account.
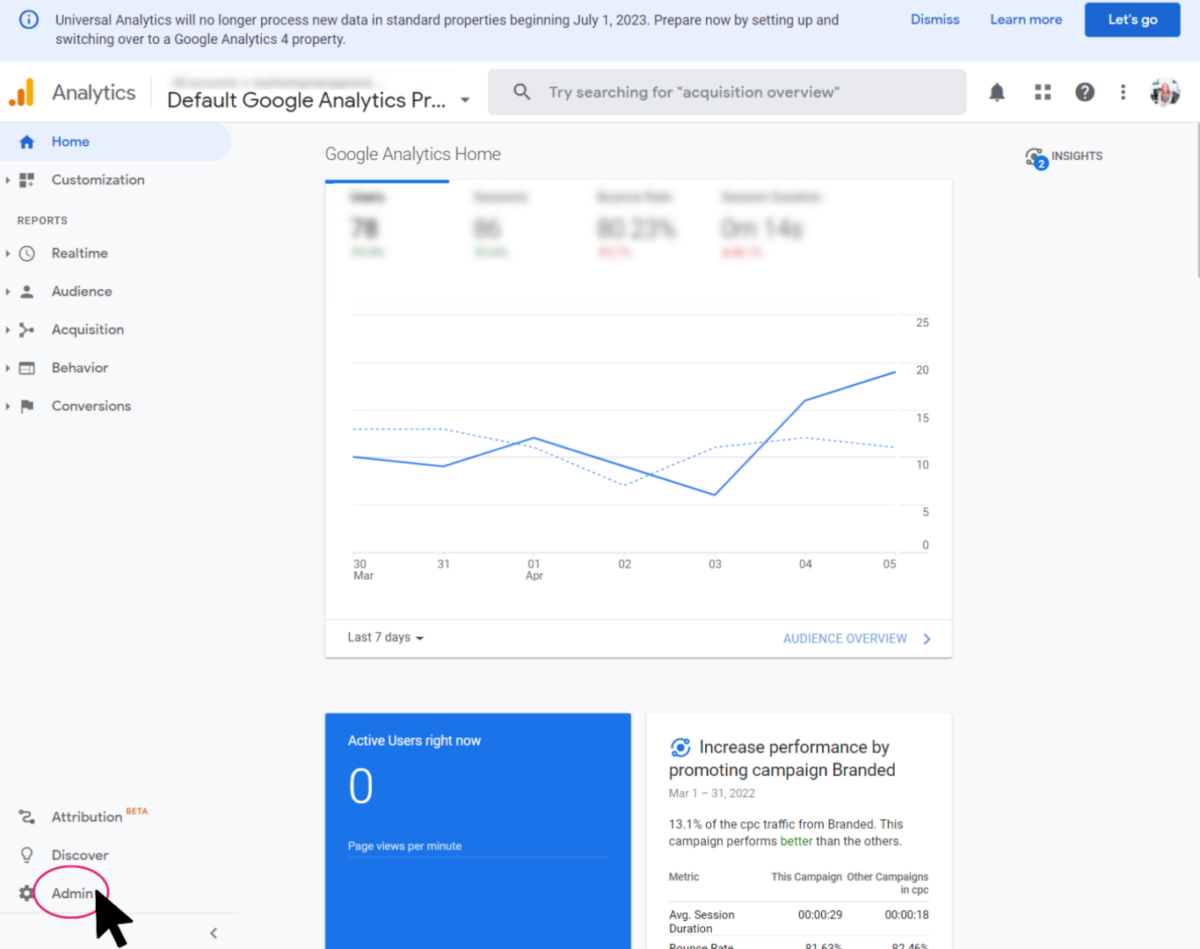
- Click Admin. Gear icon, bottom left navigation.
- Confirm that your desired account is selected.
- Confirm the desired property is selected.
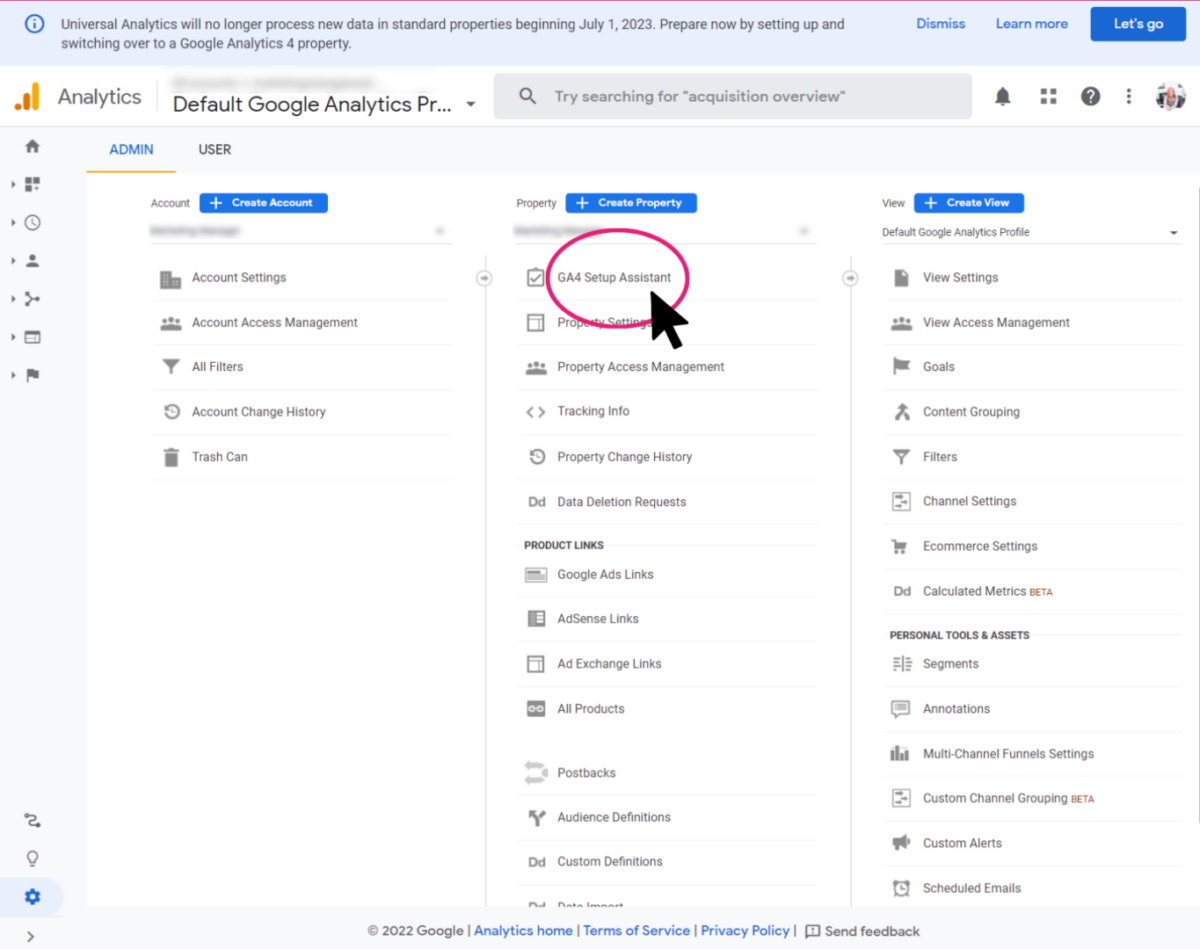
- Click GA4 Setup Assistant, the first option in the Property column.
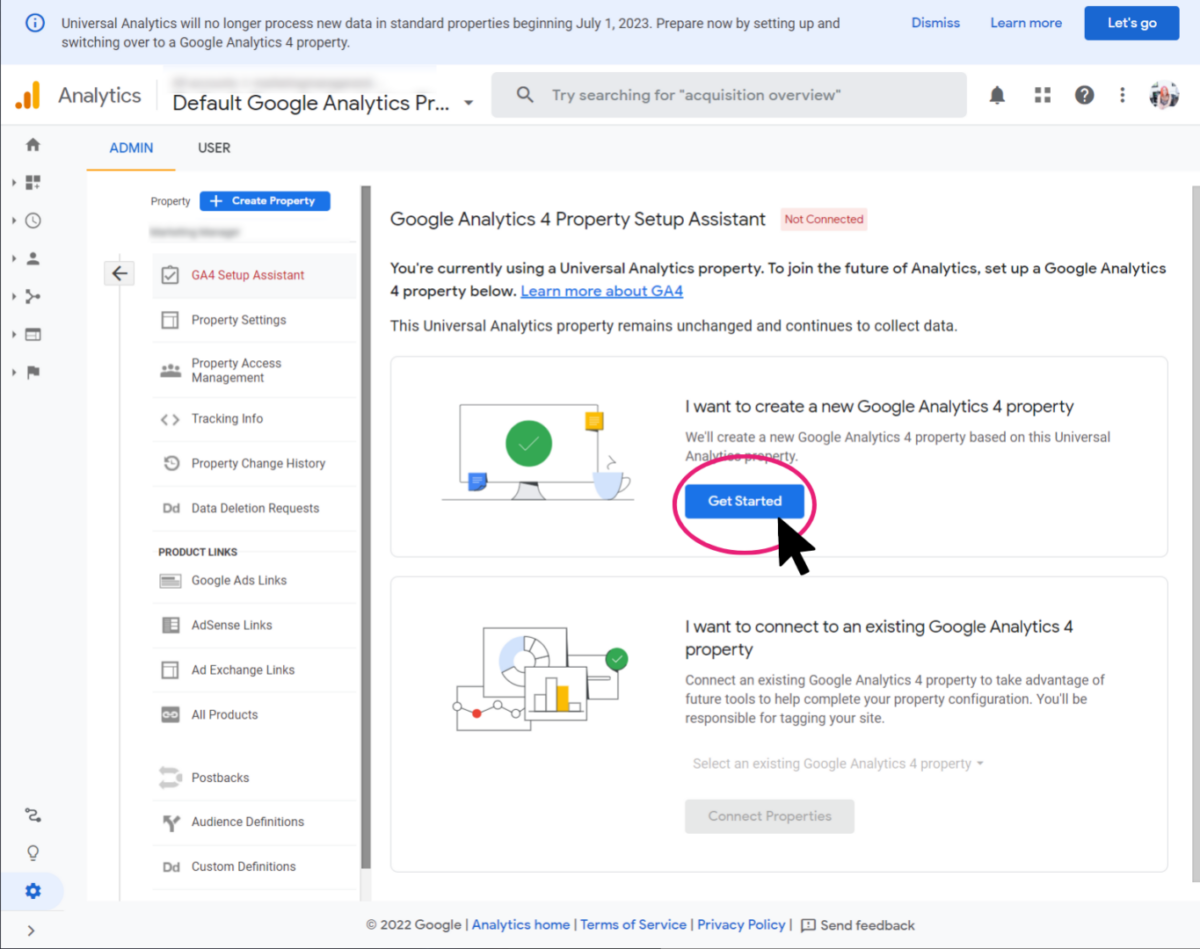
- Once inside the Setup Wizard, click the large blue button, Get Started.
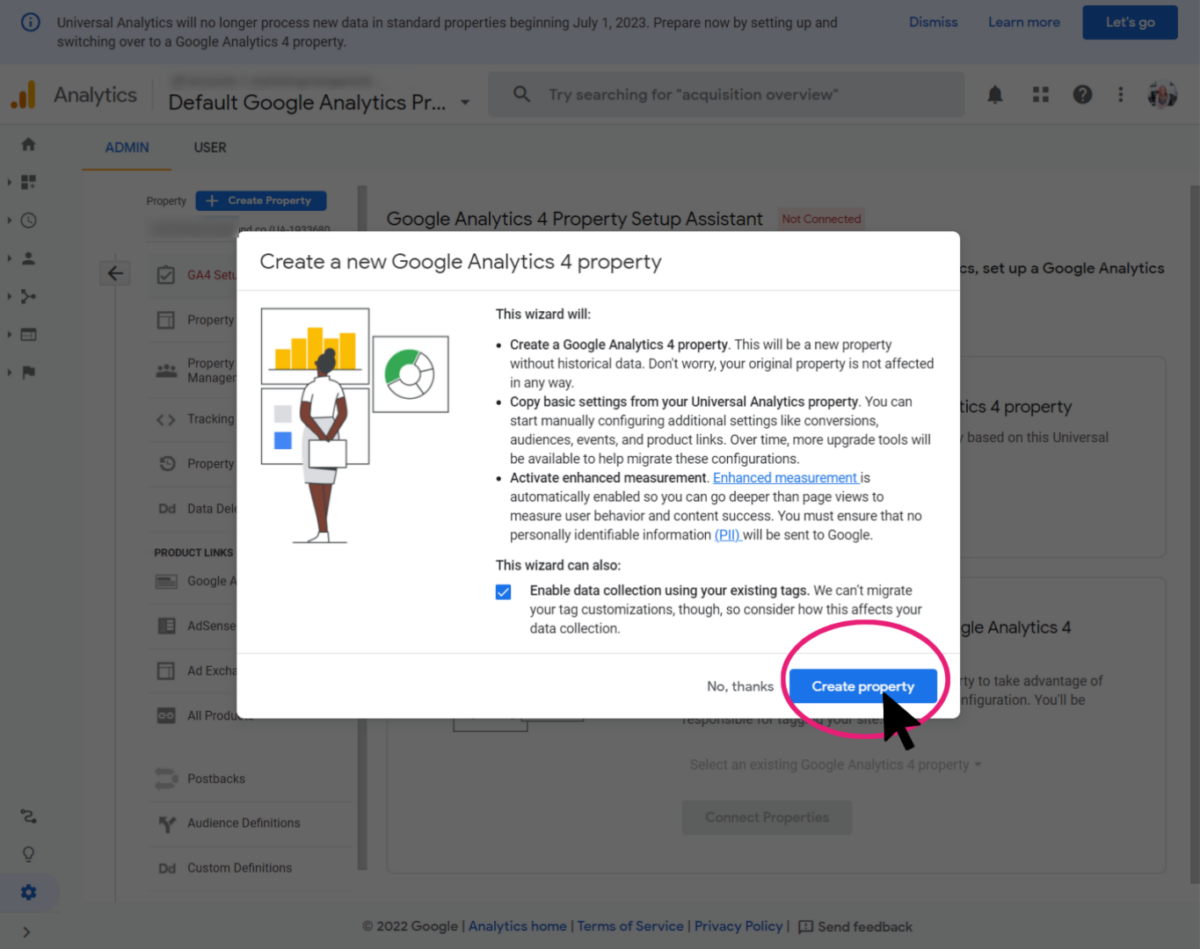
- Click Create Property.
- That is your new GA4 Property is set up and ready to go.
When you create a GA4 property you have an option to enable/disable Enhanced Measurement. This helps you to get as many events in the reports as possible without having to add additional code to your site as you would with UA.
By default, this feature is enabled and will automatically track the following events:
- Page view (event name: page_view)
- Scroll (event name: scroll)
- Outbound link click (event name: click with the parameter outbound: true)
- Site search (event name: view_search_results)
- Video Engagement (events: video_start, video_progress, video_complete)
- File Download (event name: file_download)
How to Install Google Analytics 4
When you create a new Google Analytics 4 property, you will see a Measurement ID. Copy it, you will need to use it to install GA4 onto your website. You can either do this by adding the Global site tag to your website head, this requires you to access the code of your website.
If you already have Universal Analytics installed then you just need to turn on tagging for this stream without changing the code on your page. To do this head to your UA property
- Go to Admin > Tracking Info > Tracking Code.
- Click Connected Site Tags under the global site tag (gtag.js).
- Connect up using the Measurement ID from GA4
Or you can use Google Tag Manager to add GA4 to your website. Use whatever installation method you are most comfortable with.

How GA4 can help you with reporting?
With the cries for online privacy louder than ever, tracking users across multiple platforms and multiple devices had become increasingly difficult and has started to before a real tripping point for Universal Analytics.
GA4 has new and creative solutions for this. Using enhanced machine learning techniques to help fill in the missing data gap. Allowing it to create a single-use journey from all the data linked to the same person.
Not only that but reports are easier to use and understand in GA4. Universal Analytics often required you to add additional metrics to identify trends or issues. With GA4 the reporting interface allows you to create custom reports so you can quickly spot irregularities or trends in your data.
Instead of a long list of predefined reports that try to cover every use case, GA4 uses overview reports in summary cards. If you want to dig in deeper, simply click on the scorecard.
Bye to Event Category, action and label
As previously mentioned GA4 use a more flexible data model, built entirely around Events and parameters. This means that there are fewer restrictions and required fields/parameters compared to the UA.
In GA4, there is a parameter called Event Name, and then everything else depends on what you have planned. If you wish, you can send no additional parameters. Or you can send 4 additional parameters that better describe the context of that event. For example, let’s say that someone filled in the “Request a Call back” form on your website. You could send the following event:
- Event name: request_a_call_back
- User_name: John Smith
- company_size: 99-250
- company_industry: internet and telecom
- annual_revenue: 50-100M
The last 4 items in the list above are custom parameters that you can send together with an event. However, keep in mind that there are some limits regarding the number of custom parameters that you can send with a single event.
In GA4, events can be split into four categories:
- Automatically collected events
- These include events such as
- first_visit. This is the first time a user visits a website or launches an app.
- session_start. When a user engages the app or website and starts a new session
- user_engagement. This event is fired 10 seconds after the visitor has stayed on a page. But it also might periodically fire while the app is in the foreground.
- You can find what other events are automatically collected here – https://support.google.com/analytics/answer/9234069
- Enhanced Measurement events
- These included events such as
- Page view (event name: page_view)
- Scroll (event name: scroll)
- Outbound link click (event name: click with the parameter outbound: true)
- Site search (event name: view_search_results)
- Youtube Video Engagement (events: video_start, video_progress, video_complete)
- File Download (event name: file_download)
- Recommended events
- The full list of recommended events can be found here – https://www.analyticsmania.com/post/recommended-events-in-google-analytics-4/
- Custom events
When planning the structure of the events you follow a few steps:
- Check if the event you want to track as an event is among the Automatically Collected Events
- If not, then check if your event is mentioned among the Enhanced Measurements
- If not, then check the recommended events and their naming convention
- If none of the above categories applies to your events, create a custom event with an event that you want
Custom Events
Custom events can be anything that you want to send as an event to GA4 that is not automatically tracked. This could be anything from a user visiting a certain page or filling in a contact form.
The configuration of Custom events is pretty much identical to recommended events. The only difference is that you will need to come up with your own event names. For example, if you want to track form submissions of a contact form, the name of the event can be any of these:
- form_submission
- contact_form
- Contact_form_submission
Or anything else you want.
GA4 give you complete flexibility here – though the maximum length of the name is 40 characters –
There is also a limit of 500 unique app events names. If you reach it, Google says that you won’t be able to track any other new events. And at the moment, you cannot delete unused events (which is unfortunate). Therefore, be careful about creating too many unique event names. This does not apply to web events.
How to Create Custom Events
Once you have lined out what event you want to record in GA4 there are two ways to go about creating your new custom event.
- Create events with GA4 and add new tracking code parameters to your website manually
- Install Google Tag Manager to your website and use that to add tags and parameters to events on your website

Option A: Creating an event within GA4
To create an event natively with GA4 you may also need to have access to the code of your website so that you add any additional code snippets for your new event to track correctly (Depending on how your website is built). If you are happy to do that then head over to GA4 and click on “Configure” in the left-hand navigation and then click “Create event”.
In the custom event name, you can use one of the predetermined event names or you can type in your own. Use whatever works best for the event you are creating.
Let’s say you want to track when people fill in your contact form. Once completed your user is taken to a thank you page. To track this event you would need to add the following parameters.
Custom Event name: Contact_Form_Submit
Matching Conditions:
| Parameter | Operator | Value |
| event_name | equals | page_view |
| page_location | contains | /thank-you |
This tells Google Analytics 4 that when a user views the page /thanks-you to assign the event called Contact_Form_Submit
Remember that a custom event has to match all of the parameters you have set to it. For this type of event, you do not need to add any additional tracking code to the website.
This method can be used for a multitude of different events. You could even create an event for traffic coming to your social media platform by using the page_referrer Parameter.
Make sure you carefully plan your custom events and be aware that until your custom events are fired by a real user that your event may not show up in the list of events.

Option B: Creating an event with Google Tag Manager
I recommended adding Tag Manager to any website that is doing any amount of online marketing be it SEO, Social Media or PPC. Google Tag Manager allows you to assign custom tags to actions taken by users on your website without ever having to edit the code of your site.
You can find how to install Google Tag Manager on your website here –
- If you have a WordPress website then I recommend using Google Site Kit plugin as this will allow you to easily manage all Google platforms including Tag Manager.
- Once you have installed and set up your Tag Manager account you can create your custom events with ease.
In this example, we are again tracking users who have filled in a Contact Form.
- Head over to Google Tag Manager
- Click add a new Tag, Set the tag Configuration to Google Analytic: GA4 Event. (Your Configuration Tag is where you put your Google Analytics 4 measurement tag.)
- You can call your event whatever you like, just make sure you name it something you will immediately recognise. If you would like to send additional information with your tag to GA4 then you can add Event Parameters. Let’s say this form is on multiple pages on your website, then sending a parameter that tells you where the form was filled will be useful. So you can use the Event Parameter “Referrer”. Google Tag Manager has a built-in variable for this.
- Now you need to create a trigger for this tag. A Trigger tells GTM( Google Tag Manager) when to fire the tag. In this case, we will use the Custom trigger, using a page view configuration with the Page URL containing /thank-you.
- Once your tag is set up and you are happy, hit the preview button and test your tag. GTM will show you a developer window. Fill in the form as a user would and make sure your new Tag fires.
Test your tag to make sure everything is working as it should you can Submit your tag, which essentially sets them live on your website. Once a user fires your Tag you will start to see this as an event in GA4
You can also check that your GA4 is connected properly as you should be able to see your activity on the DebugView in GA4.
If you do create a completely custom parameter for your event, you need to register custom parameters in the GA interface. In Google Analytics 4, go to Configure > Custom Definitions.
Click the Create Custom Dimensions button and then enter
- The name of the parameter. You can enter whatever you want. This is just how the dimension will be displayed in your reports.
- If you want to apply this parameter to only one event (and not to all events of the same user), then select the Event
- Event parameter. This is where you have to enter its name precisely as you entered it in the GTM tag. If your parameter name is Referrer, you must enter it here exactly like that. Don’t worry if the autocomplete feature of that field does not show your parameter yet. Just enter it and save the dimension.
Conversions in GA4
Not all events are equal, some are more important to your business than others. These are what you should track as conversions. Be it a purchase made, a specific page visited or signup to a newsletter.
If you are accustomed to Universal Analytics, then you will be familiar with “Google Analytics Goals”. In Google Analytics 4 these are now called conversions. In Universal Analytics, you were limited to 20 Goals-per view, in GA 4 that limit is 30 conversions per property.
Nearly any event with GA4 can become a conversion. All you need to do is head over to your Configure>Events and then simply click the toggle button next to it to mark this event as a conversion.
Once you do that, wait for up to 24 hours, and you will start seeing conversion data in the list of all Conversions.
Predefined Conversion
There is are a few predefined conversions that you cannot disable:
- first_open (applies to mobile applications)
- app_store_subscription_convert (applies to mobile applications)
- app_store_subscription_renew (applies to mobile applications)
- in_app_purchase (applies to mobile applications)
- purchase (applies to websites and mobile applications)
Some of these will only appear in your account if you are using GA4 to track a mobile application.

Where to find event data in GA4 reports?
There are a number of places you can find your event data they include:
- Configure > Events (this will show just the list of events with counts. Nothing fancy.
- Reports > Engagement > Events
- Explore
Since Google Analytics 4 is an event-based platform, every report is influenced by events that you send. The above reports are just the most easily accessible examples.
“Reports → Engagement → Events” report
This report will show you a list of all events that are tracked by your GA4 property. Click on any event to see a bit more information about that particular event.
Explore (a.k.a. Exploration reports)
The Explorations reports allow you to drill down into your data with as many or as few details as you need. In the Explorations, you will be able to use reports such as Free Form, Funnel Exploration, Path Exploration, etc.
(If your account is brand new then you may have to wait up to 24 hours until the data appears in these reports)
Where can I see the conversion data in GA4 reports?
- Configure > Conversions section in the left sidebar menu. This place is like an overview of all events that you have marked as conversions.
- Acquisition > Traffic Acquisition and then there is a column for Conversions in the table
- If you have implemented Ecommerce tracking, the data will appear in the Monetization reports
- Explore. For example, you can include the metric Conversions in the Exploration report.
GA4 Reports
When you first log in to your GA4 it may feel a little overwhelming, there are a lot of new things to get a handle on. There is a completely new setup and navigation in GA4. There a many useful reports that come as standard as well as new ways to set up audiences and conversions. In this part of the article, I will guide you through it all.
Even though I have already mentioned several palaces where you can find event data or conversion data in GA4 I thought it may be helpful to quickly cover the most popular reports in GA4.

Home Report
GA4 has a lot of new reports that you can use straight out of the box. The Home page report, which you can find on the left-hand sidebar under Home, is the first thing you see when you log in to your new GA4 property. This page summarizes overall traffic, conversions, and revenue for that property. This is best used as a quick check to make sure everything is behaving as expected.

Realtime Report
On the left sidebar of Google Analytics 4, go to Reports > Realtime. Like the real-time report in Universal Analytics, this report allows you to see live data of your website, but unlike UA this new version offers you capabilities to see the data on a much more granular level.
In Universal Analytics you could only see traffic from the last 5 minutes but with GA4 that has been up to 30 minutes.
You will see a map and many cards with traffic sources, the most popular events, and the number of users. You can also take a look at the snapshot of an individual user. You can do that by clicking the View user snapshot button in the top right corner.
Creating custom reports
Creating your own custom reports in GA4 could not be easier. Simply head over to Reports>Library > Create New Report. Here you can easily drag and drop metrics and dimensions to create your own easy to understand dashboards. Then you can simply save your report so that you can use it over and over again.
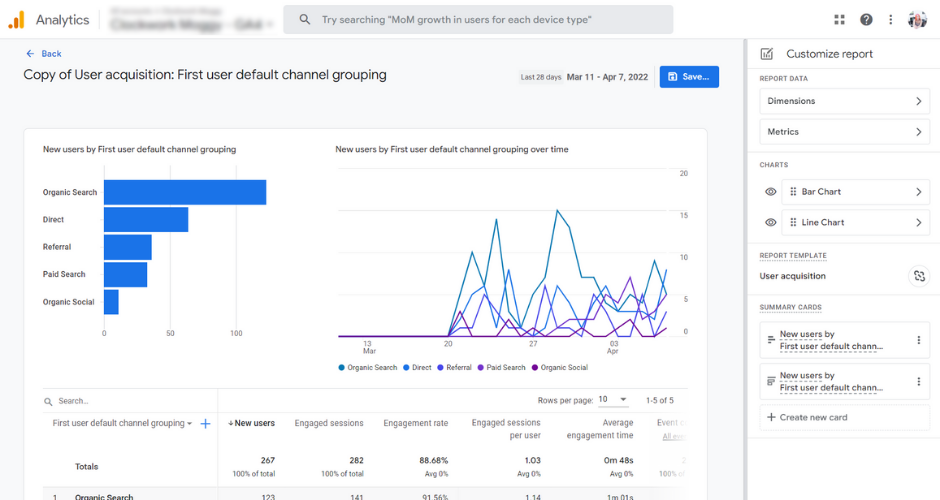
As previously mentioned Exploration Reports allow you to take a deeper dive into your data. You can also use them to create your own report. These reports are more extensive and allow you to take a deeper look into your data as well as create a number of more detailed reports, such as Funnel Exploraiong and User Lifetime.
Free Form Reports
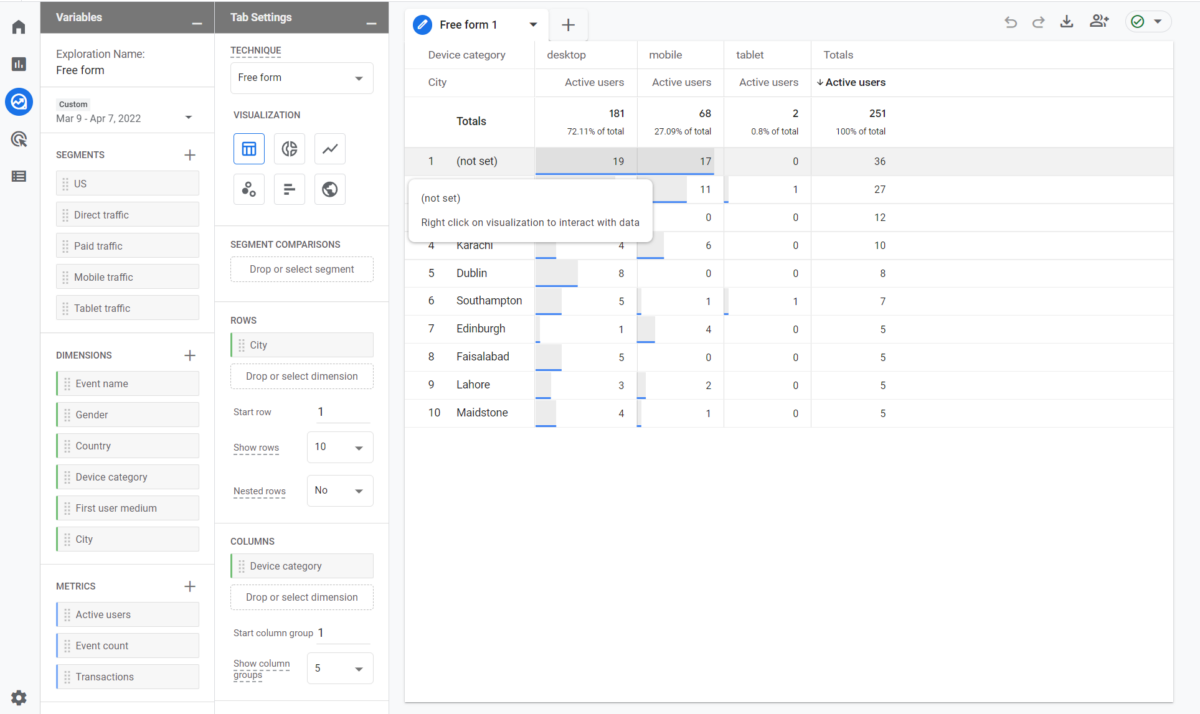
The free form report represents your data in a dynamic table layout. You can easily edit and rearranged the row and columns as you like, and apply custom segments and filters to refine your data.
Segments, dimensions and metrics are called variables. You can easily add and remove these under the Variable Panel. You can also change the date range.
Path Exploration Reports
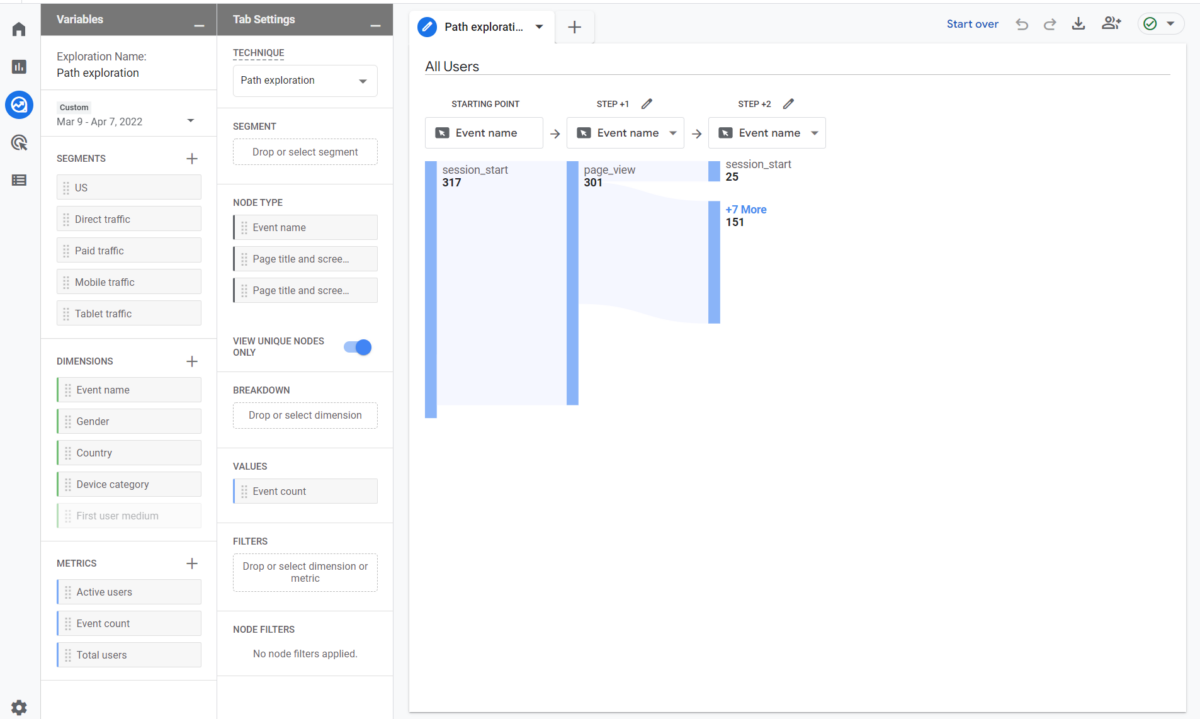
Path exploration reports in GA4 allow you to determine the sequence of pages visited by users and the actions performed. You can find the top pages that new users visited after visiting the home page, or discover what actions users take after a particular page view. These are a great way to help optimise the content on your website or identify marketing funnels to create.
Funnel Exploration Reports
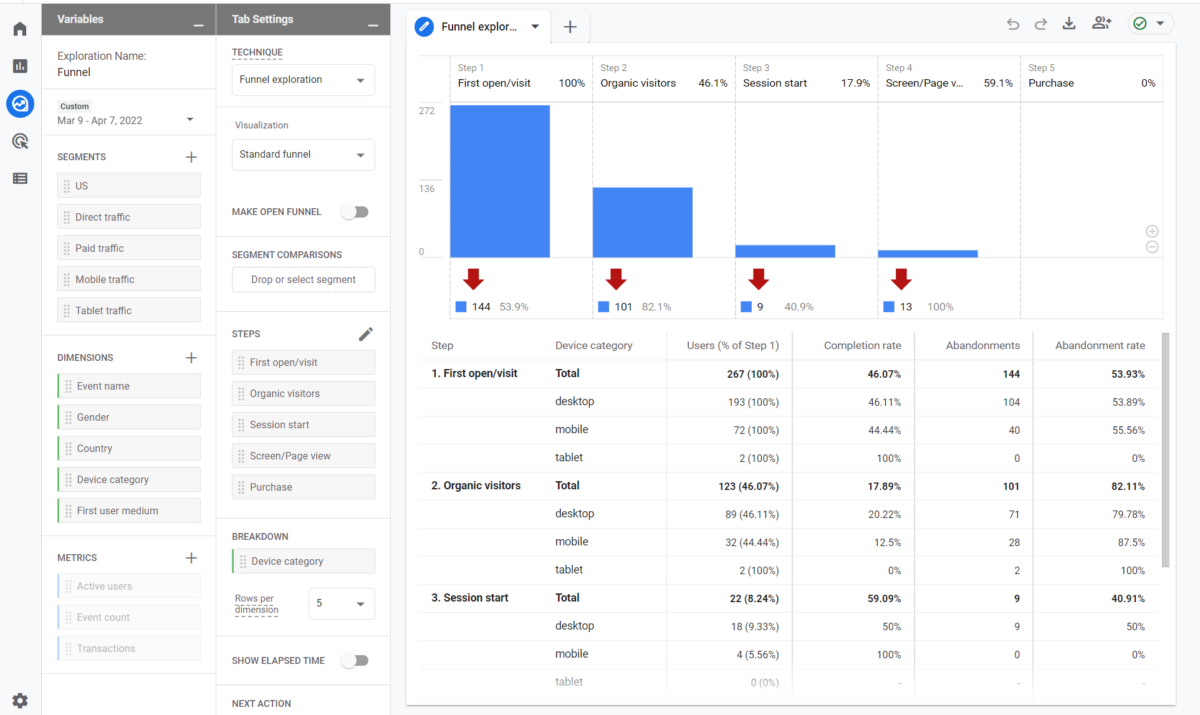
A funnel is a path that you would like your website users to follow to achieve certain goals or conversions. These are particularly important for eCommerce websites.
Funnel Exploration reports in Google Analytics 4 allow you to visualise the steps your users are taking to complete a goal. Allowing you to analyse how each step is performing, and allowing you to pinpoint any sticking points.

Your Guide to Getting to know Google Analytics 4: Final Words
Google Analytics 4 is a completely different tool than Universal Analytics, so it can seem like a steep learning curve. It can seem overwhelming at first but I feel that once you start using GA4 you will start to really appreciate the flexibility it can offer.
Of course, this article only really scratches the surface of GA4’s capabilities and uses.
While it is not an absolute necessity if you are interested in creating more complex events then Google Tag Manager is the best option. But of course, that adds another thing to the list to learn.
I hope that this article has helped you get a better understanding of GA4 and that you are now happier to get started with it. Feel free to post any additional questions you may have in the comments.
Want To Learn More About Google Properties?
No post found!

